
✨
Key Takeaways
→
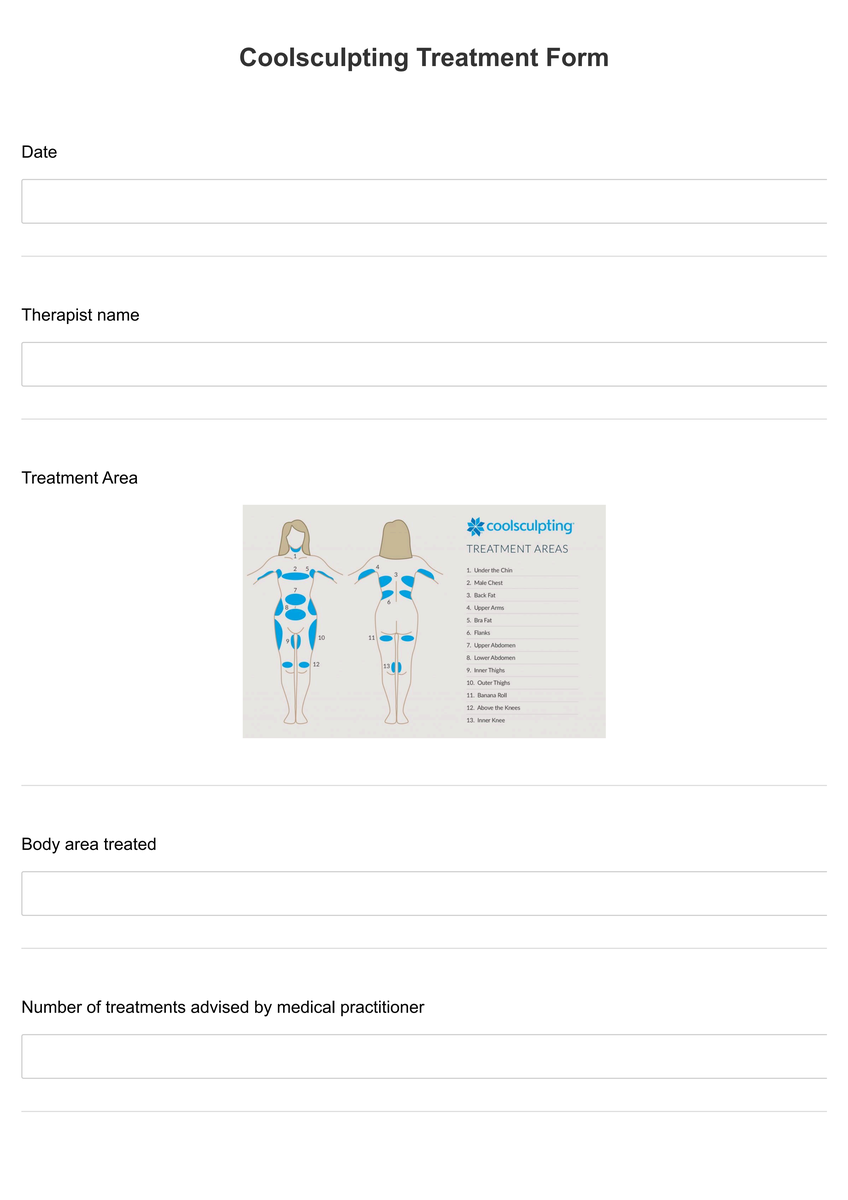
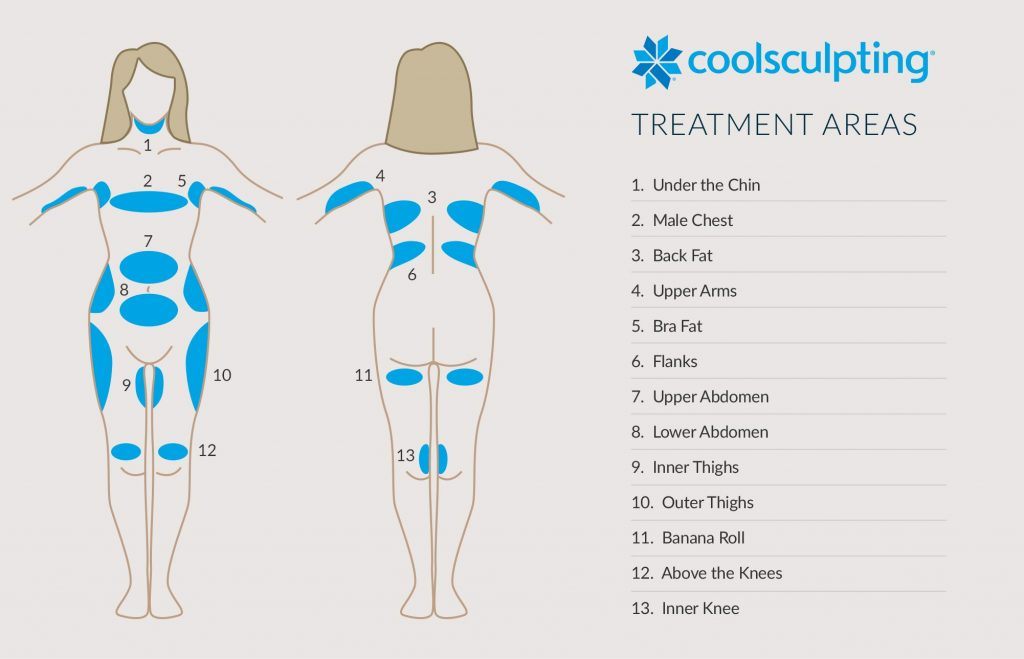
Cryolipolysis Technology The diagram illustrates how controlled cooling targets fat cells whilst preserving surrounding tissue integrity.
→
Visual Patient Education Clear anatomical illustrations enhance patient understanding and support informed consent discussions.
→
Treatment Areas The diagram identifies suitable body regions and explains anatomical considerations for optimal results.
→
Professional Documentation Serves as standardised reference material for consistent patient education across clinic consultations.
What is a CoolSculpting Diagram?
A CoolSculpting diagram is a comprehensive visual educational resource designed to illustrate the cryolipolysis fat reduction process. This professional diagram provides detailed anatomical representations showing how controlled cooling technology selectively targets subcutaneous fat cells whilst preserving surrounding skin, muscle, and nerve tissue. The diagram serves as an essential communication tool during patient consultations, helping practitioners explain the scientific principles behind non-invasive body contouring.
The diagram demonstrates the precise mechanism by which fat cells undergo apoptosis when exposed to controlled cooling temperatures. Furthermore, it illustrates the natural elimination process through which the body metabolises damaged fat cells over the following weeks and months. This visual representation enables patients to understand the gradual nature of results and sets appropriate expectations for their treatment journey.
How to Use CoolSculpting Diagram?
Step 1: Download CoolSculpting Diagram
First access the CoolSculpting diagram PDF document by downloading it from Pabau below. The high-resolution diagram can be printed for consultation rooms or displayed digitally on tablets or consultation screens. Ensure the diagram is readily available during initial consultations and pre-treatment discussions to maximise its educational value.
Step 2: Integrate into Patient Consultation
Present the diagram during the initial consultation phase to explain the cryolipolysis process. Use the anatomical illustrations to demonstrate how the cooling applicator positions over treatment areas and how fat cells respond to controlled temperature exposure.
Step 3: Explain Treatment Areas
Utilise the diagram to identify suitable treatment zones on the patient's body. Point out areas where CoolSculpting achieves optimal results, such as the abdomen, flanks, thighs, and submental region, whilst discussing individual anatomical considerations.
Step 4: Set Realistic Expectations
Reference the timeline illustrations within the diagram to explain the gradual fat reduction process. Demonstrate how results develop over 8-12 weeks as the body naturally eliminates damaged fat cells through the lymphatic system.
Step 5: Support Informed Consent
Incorporate the diagram into your informed consent process, ensuring patients understand the procedure's mechanism, expected outcomes, and potential variations in individual results.
Who is it Helpful for?
The CoolSculpting diagram proves invaluable for aesthetic practitioners, cosmetic surgeons, and medical professionals offering non-invasive body contouring services. Clinic staff members, including nurses and patient coordinators, benefit from having standardised visual materials to support consistent patient education across all consultations.
Patients considering CoolSculpting treatment gain significant value from visual learning aids that clarify complex biological processes. The diagram particularly assists patients who prefer visual explanations over verbal descriptions, enhancing their comfort level and confidence in their treatment decision. Additionally, it serves as a reference tool that patients can review during their consideration period.
Benefits of Using CoolSculpting Diagram
- Enhanced patient comprehension through clear visual representation of cryolipolysis technology
- Improved informed consent process with detailed anatomical illustrations
- Standardised educational approach across all clinic consultations
- Professional presentation tool that builds patient confidence and trust
- Reduced consultation time through efficient visual communication
The CoolSculpting diagram transforms complex medical concepts into accessible visual information, bridging the communication gap between practitioners and patients. This professional resource elevates the consultation experience whilst ensuring patients make well-informed treatment decisions based on clear scientific understanding.
Treatment Safety Considerations
The diagram incorporates essential safety information highlighting contraindications and precautions associated with cryolipolysis treatment. It illustrates proper applicator positioning to avoid sensitive areas and demonstrates the importance of skin assessment prior to treatment. This visual reference helps practitioners identify suitable candidates whilst recognising when alternative treatments might be more appropriate.
Additionally, the diagram outlines expected sensations during treatment, from initial cooling through the numbness phase, helping patients understand normal treatment responses versus concerning symptoms that require immediate attention.
Post-Treatment Care and Results Timeline
The comprehensive diagram includes post-treatment care instructions illustrated through clear visual guidelines. It demonstrates proper massage techniques to enhance lymphatic drainage and shows the gradual fat reduction timeline patients can expect. This section helps patients understand the importance of following post-care instructions to optimise their results.
The timeline component of the diagram proves particularly valuable in managing patient expectations, showing realistic progression from treatment day through final results at 12 weeks. This visual timeline reduces patient anxiety about the gradual nature of cryolipolysis outcomes.
PDF Template
Coolsculpting Diagram
Frequently asked questions
What information should be included in a CoolSculpting diagram for patient education?
A comprehensive CoolSculpting diagram should include anatomical illustrations showing fat cell structure, the cryolipolysis mechanism, treatment area mapping, expected timeline for results, and safety considerations. The diagram should clearly demonstrate how controlled cooling affects fat cells whilst preserving surrounding tissue, helping patients understand both the science and expected outcomes of their treatment.
How can clinicians effectively use CoolSculpting diagrams during consultations?
Clinicians should integrate the diagram throughout the consultation process, starting with basic anatomy education, then explaining the treatment mechanism, identifying suitable areas on the patient, and setting realistic expectations. The diagram serves as a visual anchor for discussions about individual treatment plans and helps address patient concerns with clear, scientific illustrations.
What are the key anatomical features that should be highlighted in a CoolSculpting diagram?
Essential anatomical features include subcutaneous fat layer positioning, skin surface, underlying muscle structure, and blood vessel locations. The diagram should clearly differentiate between treatable fat deposits and areas requiring special consideration, whilst illustrating proper applicator placement to ensure patient safety and optimal results.
How does a CoolSculpting diagram support the informed consent process?
The diagram enhances informed consent by providing visual evidence of treatment mechanisms, potential outcomes, and safety considerations. It helps patients understand the gradual nature of results, realistic expectations, and possible variations in individual responses, ensuring they make well-informed decisions about their aesthetic treatment journey.
What safety information should be incorporated into CoolSculpting educational diagrams?
Safety information should include contraindication illustrations, proper candidate identification criteria, potential side effects timeline, and emergency recognition signs. The diagram should clearly show areas unsuitable for treatment, demonstrate proper assessment techniques, and provide visual guidance for recognising normal versus concerning post-treatment responses.
How can CoolSculpting diagrams be customised for different patient populations?
Diagrams can be adapted to show various body types, different treatment areas, and age-related considerations. Customisation might include specific anatomical variations, cultural considerations in body image discussions, and tailored expectation-setting based on individual patient goals and realistic outcomes for their particular situation.